Environment Setup Guide
Overview
This guide provides detailed instructions for setting up the environment to run YottamineOP at your organization.
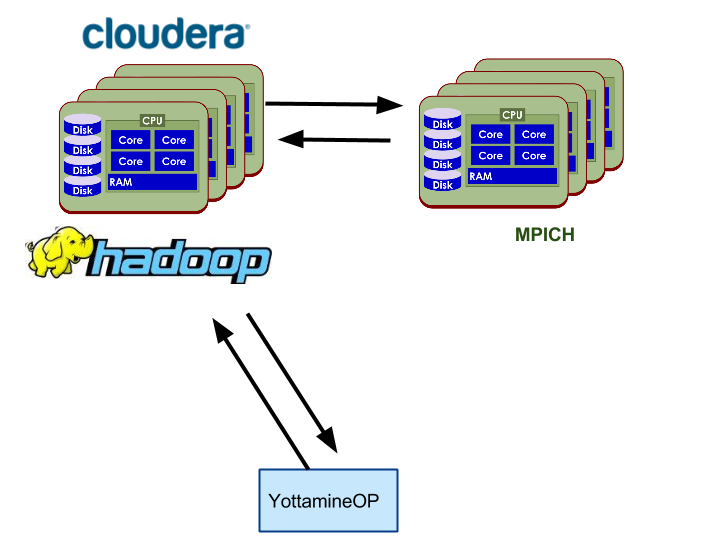
YottamineOP is an R package that utilizes Hadoop, Spark and optionally Message Passing Interface (MPI) clusters for computing large-scale and advanced machine learning models. To access all algorithm types, a separate MPI cluster is needed or users can install MPI on existing Hadoop cluster. However, MPI cluster setup is not required to access Yottamine’s Optimized Prediction solution, as Optimized Prediction can also run on the Spark parallel framework.
The following three diagrams show each of the options mentioned above.
Option 1: Using YottamineOP with Hadoop and Spark (Default)

Option 2: Dedicated Hardware shared by Hadoop and MPI.
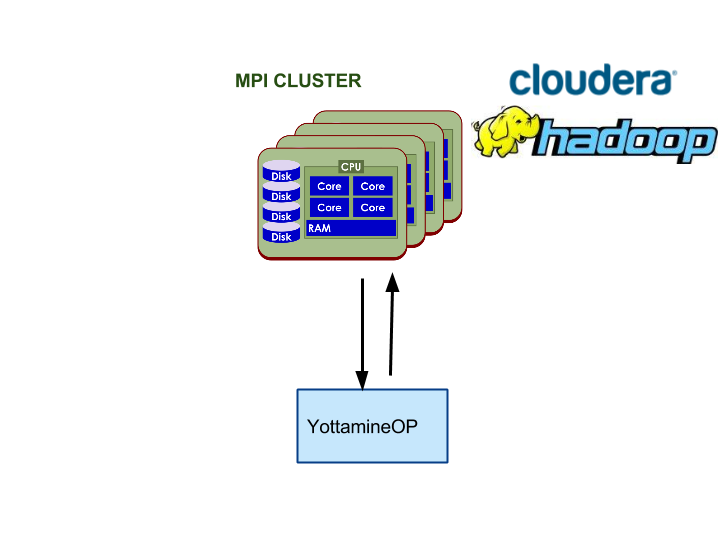
Option 3: Using YottamineOP with Dedicated MPI Cluster
Which Option to Choose?
We recommend all users to start with option 1, as it is the easiest to set up. Once users start to reach the limit of their current hardware, option 2 or 3 should be considered, as Yottamine’s MPI modeling engine will achieve close to peak performance with the user’s hardware.
Please feel free to contact Yottamine Support and we will be more than happy to assist you with this process.
Cluster Environment
The following table shows the requirements for the cluster environment. Note that this is different from the client environment.
| Requirements | Version |
|---|---|
| Supported Hadoop | Cloudera CDH 5 or equivalent. |
| Supported Operating System | Ubuntu 12.04 (64bits) |
| RHEL 6.6 or CentOS 6.6 (64bits) | |
| Supported JDK | Oracle JDK 1.6 |
| Oracle JDK 1.7 |
For YottamineOP on other Linux OS, please contact us.
Recommended Settings for Cluster Environment
We highly recommend users utilize Cloudera’s Cloudera Manager, a product offered by our partner, for setting up the Hadoop and Spark environment.
- Hadoop and Spark Cluster managed by Cloudera Manager
YottamineOP supports both secure and non-secure Hadoop clusters that are set up by the enterprise version of Cloudera Manager. Currently we only support secure Hadoop cluster that is set up by Enterprise version of the Cloudera Manager 5.4.0 parcels.
- Yarn And Spark
YottamineOP supports both secure and non-secure Spark clustesr. Currently we only support Spark clusters that are set up by Cloudera Manager. Spark will need to be added as a service using Cloudera Manager. As all Spark jobs from YottamineOP are running in Yarn mode, users will need to specify the Yarn service that their Spark service is depended on in Cloudera Manager. - SSH Access to a Data Node
Once users have a working Hadoop Cluster set up using Cloudera Manager, the next step is to create a user account on one of the data nodes of the Hadoop cluster. This user account must have SSH server enabled and users also need to enable passwordless login by using public key authentication. Please check out section 5.1 for more detailed steps or https://help.ubuntu.com/community/SSH/OpenSSH/Keys for more details.
- Secure Hadoop Cluster with Kerberos Authentication
YottamineOP only supports secure Hadoop using Kerbros and configured by Cloudera Manager. Please refer to the Cloudera Manager setup guide for more details. To enable YottamineOP to access the HDFS files remotely, users need to perform the optional step enable authentication for HTTP Web consoles for hadoop roles mentioned in the Cloudera manager setup guide.
- Create a Kerbero Principal and Keytab file for each user of the YottamineOP.
For using YottamineOP under a secure Hadoop cluster with Kerberos authentication, users also need to create a Kerbero principal and a corresponding Kerbero keytab file for YottamineOP users to submit jobs to the secure Hadoop cluster. To create the keytab file, first log into KDC machine and then log into KDC admin console via
sudo kadmin.local or kadmin
Then,
addprinc -randkey your_username@YOUR_REALM.COM
xst -norandkey -k your_username.keytab your_username
will distribute the keytab file to the client machine.
- For Linux Client:
Install KDC client on each client machine.
For Ubuntu Llinux:
sudo apt-get install krb5-user
and add your realm (e.g. YOTTAMINE.LOCAL)
YOTTAMINE.LOCAL = {
kdc = kdc.yottamine.local
admin_server = kdc.yottamine.local
}
in /etc/krb5.conf and as default realm.
For Windows Client:
Install Kerberos for Windows Release 4.0.1 (64bit version) from
http://web.mit.edu/kerberos/kfw-4.0/kfw-4.0.html
Move krb5.ini under C:\ProgramData\MIT\Kerberos5 to C:\Windows\
Modify krb5.ini for your Kerbero realm.
[libdefaults]
default_realm = YOTTAMINE.LOCAL
dns_lookup_kdc = true
dns_lookup_realm = false
[realms]
YOTTAMINE.LOCAL = {
kdc = kdc.yottamine.local
admin_server = kdc.yottamine.local
master_kdc = kdc.yottamine.local
}
For Mac Client:
- Users should already have a krb5.conf similar to:
[libdefaults]
default_realm = YOTTAMINE.LOCAL
[realms]
YOTTAMINE.LOCAL = {
kdc = kdc.yottamine.local
admin_server = kdc.yottamine.local
}
- Put krb5.conf at /etc/krb5.conf
- Each time users start a new R session with YottamineOP, there will need to be some jvm arguments to load the Kerberos settings from the krb5.conf. Users need to uncomment the following command in the sample script and change it according to their own settings.
javaP<-c(“-Djava.security.krb5.realm=YOTTAMINE.LOCAL”,”-Djava.security.krb5.kdc=kdc.yottamine.local”,”-Djava.security.krb5.conf=/etc/krb5.conf”)
.jinit(parameters=javaP)
For reference on setting up the Kerberos client in Mac, please visit the following link. http://mail.openjdk.java.net/pipermail/macosx-port-dev/2013-March/005443.html
- Prepare cluster for each user by following Cloudera Manager’s setup guide here.
- MPI Cluster Setup(Optional)
YottamineOP’s MPI model building engine also supports both secure and non-secure Hadoop cluster set up by Cloudera Manager 5.4. MPI model building engine allows the client to access additional algorithms, as well as provides computing that is close to the limit of the hardware resources. It is thus ideal for users who has dedicated hardware resources for Yottamine’s model building products and who wants the fastest run time possible. Please refer to Section 5.0 on how to setup a MPI cluster.
Client Side Environment
YottamineOP allows users to build advanced machine learning models right from their R session on their desktop which does not need to be part of the Hadoop cluster. This is accomplished through allowing YottamineOP to SSH into one of the Hadoop data nodes to submit jobs to Hadoop, Spark and MPI clusters.
The following table shows the requirements for installing YottamineOP on your client environment.
| Requirement | Version |
|---|---|
| Supported Operating System | Windows 7 |
| Mac OSX 10.9 and 10.10 | |
| Ubuntu 12.04 | |
| Centos 6.6 | |
| Supported R version | 3.02 and Above |
| Supported Java Version | 1.6 |
| 1.7 |
To run YottamineOP, users need to install the following,
R Language Runtime (Download version 3.0.2 32/64 bits for Windows)
Java SE Runtime (Version 1.6 or Higher)
Optionally users can also install
RStudio IDE (Download Here)
Install YottamineOP to R
Before installing YottamineOP to R, users need to first install rJava package from CRAN. This can be done by using Rstudio’s package installation menu with selecting Tools->Install Packages->Install From: Repository(CRAN), then type in package name rJava as follows:
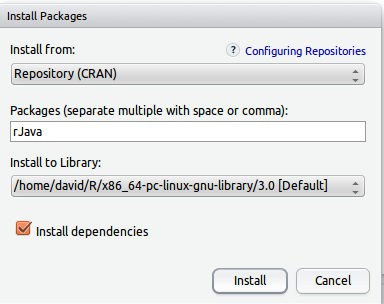
and click Install.
For Ubuntu users, you may want to install rJava directly using apt-get.
sudo apt-get install r-cran-rjava
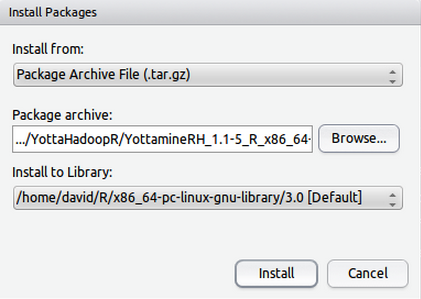
Installing YottamineOP package is very straightforward, users can either choose Rstudio’s package installation menu by selecting Tools->Install Packages->Install from: Package Archive File (.tar.gz) and select YottamineOP package:
YottamineOP_1.1-5_R_x86_64-pc-linux-gnu.tar.gz
Or alternatively, execute the following command in the command prompt.
R CMD INSTALL /location_package/YottamineOP_1.1-5_R_x86_64-pc-linux-gnu.tar.gz -l /destination/
MPI Cluster Setup (Optional)
YottamineOP package can optionally utilizes a MPI cluster to handle the most compute intensive part of the model building process. Users can skip this step if they are not planning to use a separate MPI cluster for computing models and they already have Spark installed in their Hadoop cluster. This section will go through how to set up a MPI cluster. Note that MPI cluster setup can also be done in existing Hadoop clusters, so users do not need dedicated hardware for MPI cluster. This approach is recommended only when user’s Hadoop cluster is designated for running jobs submitted by YottamineOP.
Prerequisite
Hardware and Software Requirements
Machines: Users need at least two physical or virtual machines for this.
Operating System: The cluster should have Ubuntu 12.04 installed.
Network Environment: The MPI nodes need to be in the same internal network as the user’s Hadoop cluster. The nodes inside the MPI cluster should all have static IP addresses, so the setting won’t be altered when users need to reboot their machines.
Install Required Packages
Add users to run the MPI (say mpi) on all the MPI nodes
$ sudo useradd mpi
$ sudo passwd mapi
$ password:mpi
Install Openssh Server
sudo apt-get install openssh-server
Once the openssh server is installed on all the MPI nodes, users need to make sure that the master node can log into each node without the use of a password, but instead with a key file.
YottamineOP utilizes hydra process manager of MPI, which uses SSH as the protocol for communicating and coordinating between the nodes.
If users haven’t generated a key, one will need to be created which will be used for the MPI process to use, allowing access to the clusters via SSH.
Create a SSH Key
$ ssh-keygen -t rsa
$ Enter file in which to save the key (/Users/you/.ssh/id_rsa):/home/mpi/mpisshkey.pem
Then it will prompt for users to enter the passphrase. Please do not enter a passphrase, instead, just hit Enter twice.
Users should find two files created e.g. mpisshkey.pem and mpisshkey.pub.pem.
The *.pem file is the private key and the *.pub.pem file is the public key which users will insert into authorized_key file in each of the MPI nodes for the next step.
Public Key Authentication for all MPI nodes
Once users have a passwordless SSH public and private key generated, they need to insert the content of the public key *.pub.pem to all the ~/.ssh/authorized_keys files for each node, e.g. /home/mpi/.ssh/authorized_key. If the file and folder .ssh does not exist then users will need to create them.
Next, uncomment (delete #) the line “PubkeyAuthentification yes” in the /etc/ssh/sshd_config file and also change “PasswordAuthentication” to “no”. Save the file and restart SSH service via
$ service ssh restart
Users should test the setup by logging into each of the nodes using the private key.
$ ssh -i /home/mpi/mpisshkey.pem mpi@192.168.1.6
Install MPICH2 on each node
To install MPICH2,
$ sudo apt-get install mpich2
Then test the installation.
DNS Setting on MPI Node
Each MPI node in the cluster must be able to access Hadoop nodes via their corresponding, fully qualified hostname. For example, the following are the /etc/hosts file of a two node mpi cluster and five node Hadoop cluster.
e.g.
127.0.0.1 localhost
192.168.0.210 mpi1.yottamine.local mpi1
192.168.0.211 mpi2.yottamine.local mpi2
192.168.0.200 kdc.yottamine.local kdc
192.168.0.201 nn1.yottamine.local nn1
192.168.0.202 rm1.yottamine.local rm1
192.168.0.203 data1.yottamine.local data1
192.168.0.204 data2.yottamine.local data2
Kerbro Authentication
For Cloudera Manager users that enabled Kerbros, users will need to perform the optional step in the installation guide to enable authentication for HTTP Web Console for Hadoop Roles.
http://www.cloudera.com/content/cloudera/en/documentation/core/latest/topics/cm_sg_web_auth.html
Configure YottamineOP on Client Side
Once all the cluster environments are set up, the last step is to configure YottamineOP for the user’s cluster environment. This step only needs to be performed once in the beginning, then later again when user’s cluster configuration has changed.
Locate the installation folder of YottamineOP in section 4. In the doc/samples folder users will find several R example scripts. To configure the YottamineOP, users need to use configure-settings.R as a template, and fill in the information about their cluster environment, then run the script in R console.
First, start Rstudio or R session on the client side machine, then load the YottamineOP package. Next, users need to instantiate an instance of settingsClient to continue by running,
settingsClient <- getSettingsClient();
Hadoop Data Node Setting
For both Secure and Non-Secure Hadoop Cluster
- SSH Credential for Hadoop Data node: As mentioned earlier, YottamineOP allows users to build models using the Hadoop cluster located remotely via SSH. The first setting is to specify the hostname of the Hadoop data node that users grant the SSH access in section 2 of this guide, and also specify the location of the private key file.
host <- “192.168.0.212”; #IP address or hostname
port <- “22”; # Default ssh port
userName <- “username”; # User name on Hadoop data node
sshUserKeyPath <- “/home/username/test.pem”; # Location of the private key file
setSshHadoopCredential(settingsClient, host, port, userName, sshUserKeyPath);
hostName <- “datanode1.yottamine.local”; # Specify the host name of Hadoop data node.
ipAddress <- “127.0.0.1”; # Specify the IP address of the Hadoop data node.
setHadoopNode(settingsClient, hostName, ipAddress);
#Specify License file Path
mpiLicensePath <- “/home/username/Downloads/yottamineop_50.lic”;
hadoopLicensePath <- “/home/username/Downloads/yottamineop_50.lic”;
setMPILicensePath(settingsClient, mpiLicensePath);
setHadoopLicensePath(settingsClient, hadoopLicensePath);
Remote HDFS Setting
Setting for Non-Secure Hadoop
Set Remote HDFS setting
host <- “192.168.0.200”; #IP address of Namenode
port <- “50070”;
principal <- “user1”;
password <- “”;
setRemoteHDFSCredential(settingsClient, host, port, principal, password);
Setting for Secure Hadoop Cluster
useSecure <- TRUE;
setRemoteHDFSSecureMode(settingsClient, useSecure); #Set the flag to enable secure Hadoop
host <- “http://192.168.0.225”; #IP address of the namenode.
port <- “50070”; #Port for namenode.
principal <- “hadoop”; #Kerbero/Hadoop Principal name
password <- “secret”; # Password created for Kerbero principle in section 2
primaryNameNode <- “dell-v16.yottamine.local”; #Hosename of the namenode.
#secondaryNameNode <- “nn2.localhost”;
setSecureRemoteHDFSCredential(
settingsClient, host, port, principal, password, primaryNameNode);
#Set Secure Hadoop Credential
principal <- “your_user_name”;
principalKeyTabPath <- “/path/to/keytab/yourusername.keytab”;
setSecureHadoopCredential(settingsClient, principal, principalKeyTabPath);
Configuration for MPI Cluster (Optional)
In order to configure YottamineOP to utilize user’s MPI cluster, users need to first specify the SSH credential for logging into the master node.
host <- “192.168.0.226”; #IP address of mpi master node
userName <- “mpiuser”;
sshUserKeyPath <- “/home/mpiuser/test.pem”;
setSshMpiCredential(settingsClient, host, userName, sshUserKeyPath);
hostName <- “v12.yottamine.local”;
ipAddress <- “192.168.0.226”;
setMpiMasterNode(settingsClient, hostName, ipAddress);
Note that the sshUserKeyPath variable specifies the key located on the client side. YottamineOP will use this key to log into the MPI master node.
Users will then need to add each MPI slave node with the following,
ipAddress<- “192.168.0.225”;
hostName <- “mpislave1.yottamine.local”;
addMpiSlaveNode(settingsClient, hostName, ipAddress);
ipAddress<- “192.168.0.227”;
hostName<- “mpislave2.yottamine.local”;
addMpiSlaveNode(settingsClient, hostName, ipAddress);
After the basic setting is completed, users can start specifying resource related settings in YottamineOP, these settings are stored in an instance of the clusterParameter object.
# Hadoop settings
clusterParametersObject <- clusterParameters();
clusterParametersObject@hadoopMaxContainer <- “4”;
clusterParametersObject@hadoopVcores <- “8”;
clusterParametersObject@hadoopVmemory <- “12000”;
#SPARK settings
clusterParametersObject@sparkFlag<-”0”
clusterParametersObject@sparkExecutorMin<-”2”
clusterParametersObject@sparkExecutorMax<-”5”
clusterParametersObject@sparkDriverMemory<-”1000m
# MPI settings
clusterParametersObject@mpiMaxInstance <- “3”;
clusterParametersObject@mpiMinInstance <- “3”;
clusterParametersObject@mpiCorePerNode <- “4”;
clusterParametersObject@mpiMemoryPerNode <- “16000”;
clusterParametersObject@locationMPIBuf <- “/home/hadoopte/buffer”;
For Hadoop cluster, users need to specify the maximum number of container, number of cores and memory defined by their Hadoop cluster administrator.
In terms of Spark, the option spark.dynamicAllocation.enabled will be set to True when YottamineOP starts a job in Spar., Therefore, users will need to specify the maximum and minimum number of Spark Executor they want YottamineOP to utilize. Please note that YottamineOP’s license management system will check the total number of virtual cores that is running, so if users only purchased license for part of their cluster, they need to make sure the Spark max executor multiplied by the number of HadoopVcores is not going to exceed the total number of core licenses they have purchased. Otherwise, the model building job may be disrupted due to insufficient number of licenses.
After users are done with all the settings, the following command will need to be executed to record all the settings into YottamineOP’s database.
setClusterParameters(settingsClient, clusterParametersObject);
Users should print the settings to check and see if everything is correct.
printClusterParameterSettings(settingsClient);
Run Configuration R Command to Configure Cluster
After all the settings are completed, YottamineOP provides two methods to call and deploy all the necessary library and binary of Yottamine’s powerful machine learning engine. For Hadoop and Spark users, simply execute the following command.
configureHadoopNode(settingsClient);
For MPI users, execute the following additional command in R to configure the MPI cluster.
configureMpiCluster(settingsClient);
These two commands only need to be executed during the setup process, if there is a change in configuration of the cluster, or whenever there is an update to a newer version of YottamineOP.
YottamineOP for R User Guide
Overview
This guide is designed to help users familiarize themselves with YottamineOP’s model building function in R. For help on other individual functions available in YottamineOP, users can also look at the help file which comes with the YottamineOP package.
The table below shows the availability of each algorithm in V 1.1-5 and which parallel framework is supported.
Supported Parallel Framework and Algorithm
| Algorithm Name | LinearOP | GauOP | LinearSVM | GauSVM |
| Pmode | LinearOP | GauOP | Mode5 | Mode10 |
| Spark | Yes | Yes | No | No |
| MPI Version | Yes | Yes | Yes | Yes |
Initializing
When starting a new R session, users need to first load YottamineOP into R. This can be done either using the Packages tab in Rstudio or executing the following command:
library(“YottamineOP”, lib.loc=”/home/username/R/x86_64-pc-linux-gnu-library/3.0″);
In order to keep the input parameter for each function small, YottamineOP’s R function normally takes R objects as input variables and each R object stores the parameters for each model building or prediction job.
Before executing a model building or prediction job, users need to first instantiate an instance of the corresponding object, for example, for model building job, users need to first instantiate a model building client.
modelBuildingClient <- getModelBuildingClient();
Similarly, with storage or prediction related services, users need to instantiate a client for each of the services.
predictorClient<-getPredictorClient();
and
settingsClient<-getSettingsClient();
For Mac user who will be running YottamineOP on a secure hadoop cluster, you need to contact your Hadoop system administrator for an appropriate krb5.conf configuration file. And everytime you want to run YottamineOP for a new R session you need to execute also the following to command,
javaP<-c(“-Djava.security.krb5.realm=YOTTAMINE.LOCAL”,”-Djava.security.krb5.kdc=kdc.yottamine.local”,”-Djava.security.krb5.conf=/etc/krb5.conf”)
.jinit(parameters=javaP)
ProjectParameters
ProjectParameter object is the most frequently used class in YottamineOP, because it specifies and records all the job related parameters, then submits them to YottamineOP. To instantiate a projectParameters object, simply execute the following line:
ProjectParametersObject <- projectParameters();
Once users have instantiate an instance of projectParameters object, to set a “slot” or a “field” of a project parameter object, all users need to do is use @ then followed by the name of the slot, for example:
projectParametersObject <- projectParameters();
projectParametersObject@projectName <- “adult”;
Here we have set the field projectName to be “adult”.
Similarly we can set other parameters of the job that we want to run, for example:
projectParametersObject@pMode <- “GauOP”;
The above specifies that we will be running an Optimized Prediction model with Gaussian Kernel.
Model Building Call
YottamineOP allows users to build models based on training data that is either located in HDFS file system or inside R as a data frame. There are two model building calls available:
buildModel(modelBuildingClient,projectParameters)
and
buildModelFromRData(modelBuildingClient,projectParameters, X,Y,labelDataIndex,outputTrainingDataFiletestDataX,TestDataY,outputTestDataFile)
The first method is used for building a model from training data which is located inside HDFS. The second model building call is used for building a model from an R data frame.
The following lines show an example of running the buildModel function call from training data located inside HDFS,
projectParametersObject <- projectParameters();
projectParametersObject@projectName <- “adult”;
projectParametersObject@jobName <- “job1”;
projectParametersObject@pDataFormat<-“DENSE”;
projectParametersObject@tMode <- “MODE4”; # Specify Test Data
projectParametersObject@pMode <- “GauOP”; #Specify Model Type
#training data inside HDFS
projectParametersObject@tdFilePath<-“/user/hadoopte/model-building14/ebanktr12.csv”
#test data inside HDFS
projectParametersObject@tMode4TestFilePath<-“/user/hadoopte/model-building14/aebankte12.csv”
#Specify target column number
projectParametersObject@tdCSVOutputColumn <- “532”;
#Specify the file type
projectParametersObject@tMode4TestFileType <- “CSV”;
buildmodelstatus<-buildModel(modelBuildingClient,projectParametersObject);
Note that the current version of YottamineOP only supports tmode4 which is for users to supply his/her own test data for cross validation.The slot tdCSVOutputColumn specifies the the zero based column index of the target column. Users need to specify this in order for the model building engine to know which column is the target column in their csv file.
The second method,
buildModelFromRData(modelBuildingClient,projectParameters, X,Y,labelDataIndex,outputTrainingDataFiletestDataX,TestDataY,outputTestDataFile)
allows users to build a model using the data frame inside their R environment. The key difference between this function call and the previous one is that, feature matrix X and label vector Y for both test and training data need to be specified as the input to the function call. outputTrainingDataFiletestDataX and outputTestDataFile specifies where on user’s HDFS file system they want to store the data frame in csv format. During this function call, all data frame will first be converted to a csv file locally, then uploaded to HDFS for model building.
The following lines are an example to call buildModelFromRData, where X and XTest are the training and test data frame inside R. The column TARGET_D is the target column or the label column.
buildModelstatus <- buildModelFromRData(
modelBuildingClient,
projectParametersObject,
data.frame(X[,setdiff(names(X),c(“TARGET_D”))]),
(data.frame(X[,”TARGET_D”])),
-1,
paste(uploadFilePath, trainingDataFileName, sep=””),
data.frame(Xtest[,setdiff(names(Xtest),c(“TARGET_D”))]),
(data.frame(Xtest[,”TARGET_D”])),
paste(uploadFilePath, testDataFileName, sep=””));
After the model building call is executed, users will see the running progress of the model building job in the R console. Each model building consists of multiple mapreduce jobs, and it will also invoke either Spark or MPI to perform the core computing.
When the model building call is returned, it will return a buildModelstatus object. Users can also retrieve information about how the job did. Using the getStatus() method, users can retrieve the exit status of the job, that is, if it was completed or not.
> buildModelstatus$getStatus()
>[1] “COMPLETE”
Using the getModelId() method, users will be able to retrieve the model building ID for the job,
> buildModelstatus$getModelId()
> $”1434553357457″
Model ID can be used to retrieve the model file and the result of the model building.
buildModelIdch<-buildModelstatus$getModelId();
modelResultPath <- getModelResultPath(modelBuildingClient, buildModelIdch);
Retrieving the model result path
Successfully retrieved model result path
> optimalModelFilePath <- getOptimalModelFilePath(modelBuildingClient, buildModelIdch);
Retrieving the optimal model path
Successfully retrieved optimal model path
> convertedModelFilePath <- getConvertedModelFilePath(modelBuildingClient, buildModelIdch);
Retrieving the converted model path
Successfully retrieved converted model path
> modelResultPath
>[1] “/user/hadoopte/adult/job1-1434553357457/adult_job1OptimizedP.result
Then users can download the result file and model file.
> # Download results and model files
> # Split the file path to get the name
> splitModelResultName <- strsplit(modelResultPath, “/”)[[1]];
> modelResultName <- splitModelResultName[length(splitModelResultName)];
> resultFile <- paste(downloadPath, modelResultName, sep=””);
> downloadFile(storageClient, modelResultPath, resultFile);
Downloading file /user/hadoopte/adult/job1-1434553357457/adult_job1OptimizedP.result to /home/david/adult_job1OptimizedP.result
File successfully downloaded
Users can also use the upcoming Yottamine Studio to produce a polished 3D rendering of the result from the GauOP algorithm.
ModelID is persistent, therefore users can always use it to retrieve information on jobs that were run in the past.
Data Preparation
Just like most of the core machine learning engines, Yottamine’s Optimized Prediction engine only takes input data in pure numeric form. However, in real-world applications, we often encounter data in many different forms. One of the most common non-numerical data type is categorical variables, for example,. Gender.
YottamineOP transforms categorical variable into numerical form, by expanding them into dummy variables. For a column with three categories, YottamineOP will convert it into three columns of 0 and 1 dummy variables. Unlike the classical modeling approach, such a conversion will not impact the performance of YottamineOP. However, reducing the dimensionality will reduce the amount of computing time.
Missing Values
Missing values is a common feature in many data sets. YottamineOP will fill in missing values using some of the most common strategies. For categorical variables, missing values will be filled with the most common element, whereas for continuous variables, missing values will be filled with the average value.
Prediction Function Call
Once the models have finished building, the next step will be to score data on unseen data set to predict the outcome. Yottamine Analytics provides a number of ways to consume the models developed using the Yottamine Predictive Modeling Framework. In YottamineOP, we provide two function calls that will utilize user’s Hadoop cluster for very fast parallel scoring of the data inside R (as data frame) or on user’s HDFS file system.
To invoke the prediction function, first instantiate a PredictorClient object,
predictorClient<-getPredictorClient();
then define a projectParameter object,
projectParametersObject <- projectParameters();
projectParametersObject@projectName <- “adult”;
projectParametersObject@jobName <- “prediction-job1”;
projectParametersObject@modelFilePath <-“/user/hadoopte/adult/job1-1433991110033/optimal/model_3_20.455366044145972_1000.0.model”;
The modelFilePath can also be retrieved using model ID from buildModelStatus, e.g.
projectParametersObject@modelFilePath<-getOptimalModelFilePath(modelBuildingClient,modelID);
Depending on where the data to be scored is stored, different call methods will be used. For data that is inside R as a data frame, the clusterBatchScoreFromRData should be used as follows:
predictionBuildStatus <- clusterBatchScoreFromRData(
predictorClient,
projectParametersObject,
data.frame(Xtest),data.frame(Ytest),
-1,
paste(uploadPath, testDataFileName, sep=””));
This call method takes the R dataframe and uploads it to HDFS for Yottamine Predictive engine to score. The uploadPath and testDataFileName variables are for specifying where the R data frame should to be upload to in HDFS.
The second prediction function clusterBatchScore is designed to score existing data on the HDFS file system. The file should be a csv file. To make this call, users need to also specify where the file is located on HDFS, by specifying tesDataFilePath in the projectParameters object.
projectParametersObject@testDataFilePath<-“/user/hadoopte/prediction/predictionTest.csv”;
projectParametersObject@projectName <- “adult”;
projectParametersObject@jobName <- “prediction-job1”;
projectParametersObject@modelFilePath <-“/user/hadoopte/adult/job1-1433991110033/optimal/model_3_20.455366044145972_1000.0.model”;
predictionBuildStatus<-clusterBatchScore(predictorClient,projectParametersObject,”FALSE”)
The last argument of clusterBatchScore is the RowIndexInclude flag. This flag tells YottamineOP if a row index is already included or if YottamineOP needs to automatically generate the index. This is required because using Hadoop’s mapreduce framework for scoring will cause the final output of the file to not be in the original order with the index. If users want to use their own index, this property needs to be set to “TRUE”. Please note that the index should be at the beginning of the line, and separated by a tab (\t) from the rest of the feature, for example:
index feature1,feature2,feature3…..
It is also important to note that users need to make sure the label column is also included for every single data point. The label column should also be located at the same location as it were in the training data.This will ensure the Yottamine Prediction engine will make the correct mapping on the input test data set. If the build model from R data call was used, the label column should be attached at the very end of the feature columns.
Analysing the Result in R
YottamineOP provides function for users to load the result of the prediction and analyse them inside R. The predictionBuildStatus object returned from the prediction call can be used to retrieve the predictionID for the job.
predictionId<-predictionBuildStatus$getPredictionId();
Users can use this predictionId to make a call
predicitonresult<-getClusterBatchScoreResultAsDataFrame(predictorClient,predictionId);
to retrieve the results into R.
Once the results are stored into the predictionresult data frame, users can access the index, predicted label and raw_score from the classifier by executing
predictionresult@resultMatrix$’record_id’;
predicitonresult@resultMatrix$’predicted_result’;
predictionresult@resultMatrix$’raw_score’;
to perform further analysis.